 |
 |
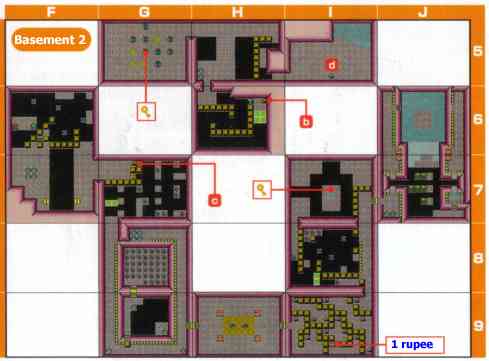 |
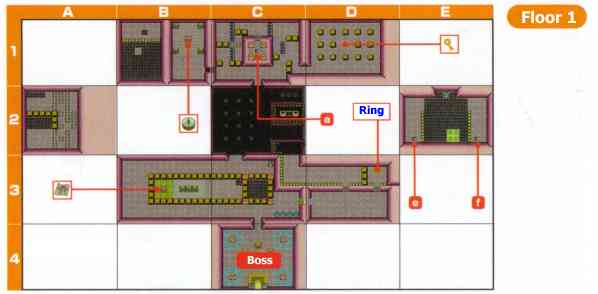
 1. From Entrance(4-C), 3-C, 3-B, 3-C, 2-C, 1-C and 1-D.
    Defeat all 4 Wizrobe in 1-D and get a key. Then 1-D,
    1-C, 2-C, 3-C, 3-B, 3-C and then to 3-D.
|
 2. 3-D go upstairs and to 2-C(right-bottom). Shoot
    Slingshot with Fire Fruit and lit the room.
    Margaret appears. Down to the blocks area.
    Margaret will rush towards you. Step back and
    cut with sword.
|
 3. In 1-C, bomb the cracked wall and go 1-B. Get a
    compass in t-box. Back to 1-C and get down the stairs.
|
 4. Go 5-B and step on switch. Use tranpoline to go
    1-B and step on switch. Then jump into hole to go
    5-B againto get a key.
|
 5. In 5-C, there are 8 canons. But 7 are canon and one
    is Amos. If you touch and Amos start to move, use
    Boomerang to defeat it. Move canon onto switch to
    open door for 6-C.
|
 6. Down the stairs in 6-C to go 6-H. Jump on moving floor
    and finally use Magnet Glove to go 5-H. Center floor in 5-H
    are rushing tiles. Run to 5-G before floor vanishes.
    in 5-G, stepping on switch moves canon statue.
    1. step on switch down to move vertical line.
    2. step on left to move horizontal
    3. step on upper
    4. step on right
    These process(1-4) makes all canons in fixed position.
|
7. Back to 6-C. And then to 7-C.
Move blocks to make space for moving tranpoline.
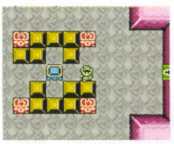 Move tranpoline to the place shown in the pic below.
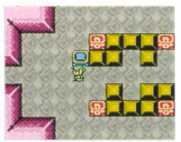 Jump with tranpoline to 3-C. Get dungeon map at 3-B.
Back to 3-C and jump into hole to go 7-C.
Then go 7-D.
|
 8. Defeat Amie
    Use Fast Fruit and lit four torches. Amie appears.
    Amie moves around you, so do not move and wait for it.
    Circling Attack.
|
 9. Back to 7-C and go 7-B. Get in water. When Roler comes,
    dive in the water to let it pass over. Go down stairs to 7-G.
    Then go to 7-F. Defeat all <Tartknack>. Block arrows
    with your shield and shoot Ouch Fruit with Slingshot.
    Move to the leftside and go 6-F. Cut switch. If switch is on,
    go back to 7-F and go 6-F(right).
|
10. Use Magnet Glove for turn-around magnet. You are to go
    to the place at tranpoline is. First use Blue tranpoline to go
    6-A. Defeat 2 Stulfoses to open door and jump into hole to
    go back to 6-F. Now use Red tranpoline to go 2-A.
    Jump into hole in the left-top of the room to go 6-A.
    Then go to 5-A.
|
11. Use Magical Boomerang to defeat all Keese in this room first.
    Then jump on to moving floor to reach center. Go to t-box
    and get <Feather Mantle>. Then let's use it to
    go back to the room-entrance.
    (If you push button shortly, jump like RockBird Feather.
     If push longer, you jump far. )
|
12. Jump into right-top hole in 6-A to go 6-F. Jump to 7-F and
    go to 7-G. Stairs up. From 7-B, 7-C and to 6-C. Stairs down.
    Go 5-H to right side of the room and use Feather Mantle to
    go 5-I. Defeat all Magness and Blue tranpoline appears.
    Move tranpoline upward for three blocks. Jump on it to 5-D.
    Move iron ball onto switch and get a key.
|
13. Then 5-C, 6-C, 7-C to 7-B. Stairs down to 7-G. Guard rushing
    tiles and let them all disapper. Jump to go 8-G. Pass 9-G to
    go 8-G(right). Move pots away and defeat all Tails. To defeat
    safely, use Ouch Fuirt with Slingshot. To save your Fruit,
    Stand at the edge and waitfor Tail to come near and cut.
|
14. In 9-G, Use Fast Fruit and Feather Mantle to Jump right. Step on
    Switch and back to left and 9-H.
|
15. Mini-Boss: Margaret and Amie
    Here, if all the flames goes off, you will be put back to
    the very first entrance. Then you have to do whole process
    again 'till here. You'd better stick on lighting torches
    more than defeating them. While lighting torches, Amie/Margaret
    come near torch to blow it off, then attack Amie/Margaret.
    Takes a long time but finally, Margaret and Amie will be
    defeated.
|
16.
 |
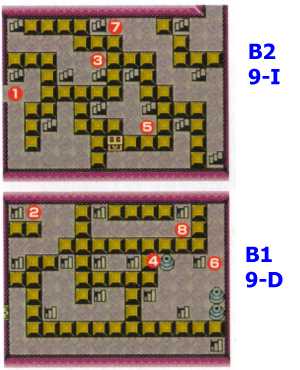
    Move in numbered order
    to finally go to 8-I.
|
|
17. Use Magnet Glove for turn-around magnet to go 7-I.
    In 7-I, defeat all the enemies and get a key.
    Then go back to 8-I. ( This time, push the right-most
    block into hole and pass away. No need to use Glove )
|
18. Go into 7-J, pass 6-J and again to 7-J. Here you see
    stone blocks in line with switch at the end of line.
    You must step on switch in order. Line with one stone, first.
    Two stones next and three stone the last.
    Now you can go 6-J(right). Step on switch to get
    Red tranpoline. Jump to 2-E.
|
19. In 2-E use stairs(e) to go down to 6E. Make upper switch to blue.
    Make lower switch red. Back to 2-E. Then down stairs(f) to 6-E.
    Make lower switch red to open door.
    Back to 2-E and jump into hole next to Owl statue.
|
20. In 5-E, defeat 4 Stulfoses. Get Boss-room key in t-box.
    Jump in hole at 6-E. Back 6J, 7-J, 7-I, 8-I, 9-I, 9-D.
    Now for Boss room.
|
21. Boss: Gliowke
    Give damage to two heads equally. Circling attack will do.
    One of two heads split away. Then attack Gliowke before the
    head come back to join again. When both heads are gone,
    Gliowke shakes the room. When room is shaking, Link can't move.
    So before the room starts to shake, jump with Feather Mantle.
    Keep this attack again and again until Gliowke explode.
|


 Move tranpoline to the place shown in the pic below.
 Jump with tranpoline to 3-C. Get dungeon map at 3-B.
Back to 3-C and jump into hole to go 7-C.
Then go 7-D.
