 |
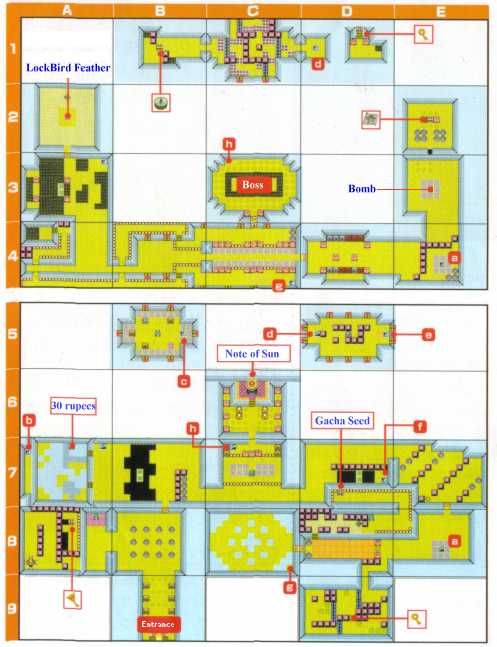
 1. If you enter 8-B, there are <Togezo> waiting for you.
    Use shield to block Togezo's attack. They turn upside down when
    hit shield. Cut by sword when upside down.
|
 2. Go 7-B when Togezo is all gone. Then go to 7-E.
    Defeat all <Floor-master>. Then push pot onto switch.

|
 3. Pass 8-E, 8-D and go to 9-D. Use Power Bracelet to move roller.
    Becareful for cracks on floor. Treasurebox in this room has key in it.
    Get a key and back to 8-E. Climb up stairs in this room.
|
 4. In 4-E, move a right-top block and go to 3-E. Defeat
    2 <Tails> in this room and get a bomb in t-box.
    Why bomb ?
    Set sword and poke wall(North side). Listen to the sound when poking.
    Bomb the place where makes different sound.
    You can go to 2-E and get dungeon map.
|
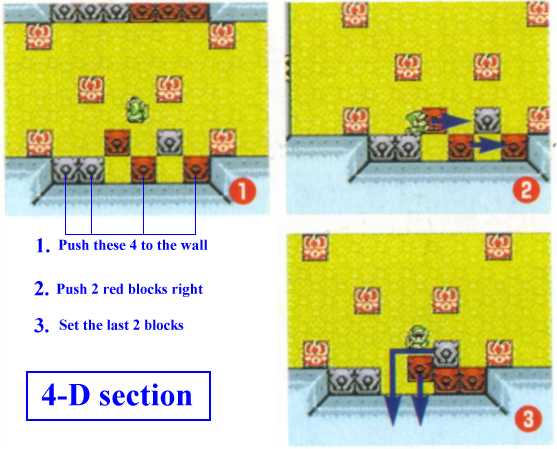
 5. Back to 4-E and move block next to the one you moved before.
    Then move the block in left row(third from bottom).
    Get into 4-D. See picture below and move block to make the order
    equal to the blocks on top of the room.

|
 6. Pass 4-C, 4-B, 4-A, 3-A and go to 2-A.
    But do not enter the room. Stand at the entrance and push wall
    to the right. Floor in this room is moving and things on it
    are also moving. If you push wall, <Mane-Mane> you see
    in the room will pushed together and move towrds you.
    When they get near you, cut by 'Circling Attack'.
    Do this twice or three times and Mane-Mane vanishes.
    Becareful for <Trap> and get t-box in the center of
    this room. You get RockBird's Feather
|
 7. Back to 3-A and use RockBird Feather to jump on to the moving floor.
    Go to the left end of this room and jump into the hole. You'll be
    in 7-A. Climb down the stairs and go to 5-B(b point to c point).
    Use trampoline in this room to jump to 1-B. Get a compass and
    jump into hole to back to 5-B. Move trampoline to the floor with
    red tile. Jump with trampoline to 1-B and then go to 1-D.
|
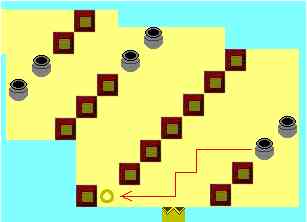
 8. In 1-D, down by stairs to 5-D. Move trampoline.
    (left-down-right-up-right) Set it on colored tile.
    Jump with it to 1-D. Get a key in t-box. Back to 5-D.
    Use stairs(e) to 7-D.
|
 9. From 7-D to 8-D. DO NOT STEP ON THE SWITCH NOW.
    Use RockBird Feather to jump the switch and go left.
    (If switch is on, floor start to vanish...)
    Go to 8-C.
|
10. Mini-Boss: Aoum-Eye
    Aoum-Eye shows its head from water. When head is shown, use
    Power Bracelet to pull Aoum-Eye out of the water. Then cut
    with your sword. There are three Aoum-Eyes in this room.
    Defeat all of them. Then stairs(g) appears in this room.
    <Small hint: If you throw Fruit of Ouch, Aoum-Eye attacks
    the fruit. You can easily get near to the Aoum-Eye while
    Aoum is attacking fruit.>
|
11. From 4-C, go to 4-A. Get into hole on left-top of this room.
    You will be in 8-A. You can see blocks at hole next to them.
    (Not the one near t-box) Push blocks into hole and jump with
    RockBird Feather to the t-box side of the room. Get a key for
    Boss room. Then go to 9B(Entrance) and use warp to 8-C.
    Go up stairs to 4-C and move to 4-B. Jump to the other side
    of the room and go to 4-C.
|
12. Boss: Gamoth
    The recommended set of your weapon is <Sword> and
    <RockBird Feather>. Gamoth will fly for some time and
    stop in the center of this room. Wait for it stops and rush
    to it and cut by sword. When Gamoth turns to blue, it means
    that Gamoth start to attack you. When blue, move back to
    wall side. When heart power weakened, kill <Little Gamoth>
    that Gamoth give out. You can get heart power.
    If you fall down to 7-C, you can use trampoline to jump back
    to Boss room. But the damage you gave to Gamoth will be
    cleared up. So you'd better be careful not to fall down.
|
