 |
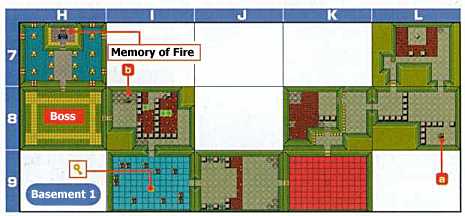 |
From Entrance(7-D) to 6-D. Fire-Keese in this room fly high.
Defeat them when they came down towards you.
|
From 6-D to 6-C. Defeat all Stulfoses and Skullknights.
Then go 4-B, 5-B and to 6-B(left). Get Compass from t-box.
|
Go 7-B.
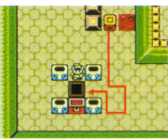 Move Dice Block to set it Blue-up. Get a key from t-box.
|
Go right-top to 6-B. Then to 6-C, 6-D, 6-E.
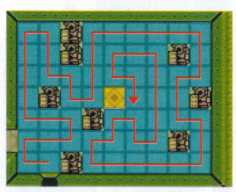
<6-E>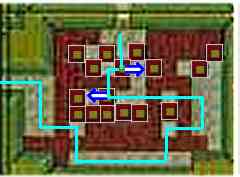 Light blue line is how Link move. Blue Arrow mark is
how to move block. Then go 5-E. Go 5-F to change switch.
Then get on rail truck and go 6-F. Get dungeon map.
Get on truck to go 5-F. change switch and go to 7-F.
Light blue line is how Link move. Blue Arrow mark is
how to move block. Then go 5-E. Go 5-F to change switch.
Then get on rail truck and go 6-F. Get dungeon map.
Get on truck to go 5-F. change switch and go to 7-F.
|
 Shoot Beans Gun to change color of switch. Get a key.
|
From 7-F to 6-F. Cut to change switch as soon as you
enter 6-F.
|
From 6-F(right), go 5-F, 5-G, 4-G. In 4-G, you are
to pull Lever with Power Bracelet. Lava pool will be
covered by tiles. But the tiles soon disappear.
Rush to the left-top of the room.
( You'd better defeat Keeses in this room, first )
|
From 3-G, 3-F to 2-F. In the blocks, you see tiles
that you can change colors with jump on it.
Make color equal to the blocks on right.
Then go to 2-E.
|
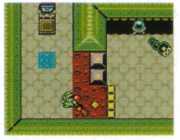
In 2-E, Trap is waiting for you. Enter the room and
jump towards left. Defeat PigBrins and then go to
Dice block. Be careful for Trap to go upper of the
Dice block. Soon push the block down for two times.
Get to left to the Dice and soon push it left to
upper of the hole. Push it down onto the hole.
This will make the Dice Blue up.
Take care for the cracks on floor, too.
|
Get on Rail Truck and go 2-D, 1-D to 1-E.
Jump on the moving floor and shoot color-switch
to make it Red. Get a key.
|
From 1-D to 1-C. Open locked block and jump to the
color-tile to make it Blue. Then get back to 1-D and
get on truck.
|
On truck, go 1-C, 2-C, 2-B to 3-B. In 2-C, where you see
Stulfoses, shoot Beans Gun to defeat them all. You have to
get on truck again and again to defeat them all. In 2-B,
jump on Moving Floor and take a time to see how floor
moves. Jump carefully. In the pot(right-top of room),
you might find fairy to make your heart full.
In 3-B, you see color blocks in room-top. Make the
color-tiles equal to the blocks. Get a key.
|
Mini-Boss: Mujune
From 2-B on rail truck, go 2-C, 2-D, 3-D, 4-D to 4-C.
Mujune's sword fly towards Link. But it fly so slow.
Move to let the sword hit Mujune's shield. Three hits
will collapse both sword and shield of Mujune's.
Then Mujune start to rush towards you. Step aside and
cut Mujune.
|
From 5-C, 6-C to 6-D. Bomb the cracked wall to enter 5-D.

See red line and follow exactly to let floor-color change.
Then you get <Exchange Hook>.
See red line and follow exactly to let floor-color change.
Then you get <Exchange Hook>.
|
In 5-C, you see diamond chaped block. Use Exchange Hook to
go the other side. Go 4-C, 4-D(staris), 3-D(Exchange Hook),
4-D to 4-E.
|
From 4-E, 5-E, 5-F, 5-G, 4-G, 3-G to 3-F. Stairs down to
8-L and then to 7L. Use Exchange Hook to diamond block or
to pots to go down-left of the room to 8-L(left-top).
|
From 8-L to 8-K. Use Exchange Hook for pots to pass lava
pool and to 9-K. Then go 9-J and to 9-I.

Again step as red line(in picture) shows you. Get a key.
Then back to 8-I and stairs up and go to 5-C.
Again step as red line(in picture) shows you. Get a key.
Then back to 8-I and stairs up and go to 5-C.
|
From 5-C to 5-B and to 5-A. Pull lever with Power Bracelet
to make floor on lava. Move as fast as possible. Finally
you have to jump with Rockbird Feather to 4-A.
|
In 4-A, Check where are the pots located. Again pull Lever.
But this time, you have to use Exchange Hook for pots and
go left after tiles disappeared. Check carefully how you
can make a route to the room-left.
|
In 3-A, you need to get Boss-Room key. To get it, see below.
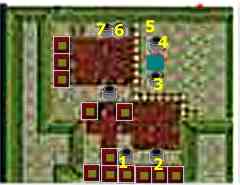 Power Bracelet to break or move pot(1) and pot(2). From (2),
use Exchange Hook for pot(3). Push pot(4) to (5). Stand
next to pot(5) and use Exchange Hook for pot(6). Push pot(7)
onto switch. Use Exchange Hook to pot(5). Get the key.
Exit the room from right-bottom to 4-A, go 5-A to 5-B.
Exchange Hook to diamond block and go 5-C. Stairs down
to go 8-I.
Power Bracelet to break or move pot(1) and pot(2). From (2),
use Exchange Hook for pot(3). Push pot(4) to (5). Stand
next to pot(5) and use Exchange Hook for pot(6). Push pot(7)
onto switch. Use Exchange Hook to pot(5). Get the key.
Exit the room from right-bottom to 4-A, go 5-A to 5-B.
Exchange Hook to diamond block and go 5-C. Stairs down
to go 8-I.
|
Boss: Patara
Use Exchange Hook to Patara. It stops just after exchange.
Cut with sword to defeat it. Do not pay attention to
Little Patara, 'cause it appears endlessly. Concentrate on
Patara only.
|